| Biz ancak bu sayfa şu anda Google Translate kullanarak çevrilen makine, mümkün olduğunca çok dilde web sitemizi lokalize için çaba. | yakın |
-
-
ürünler
-
kaynaklar
-
destek
-
şirket
-
Sıfırdan bir PC yükseltme – Walkthrough – Bölüm 1Upgrading a PC from Scratch – Walkthrough – Part 1
Tarafından Steve Horton Ağustos 13, 2012assembling, cpu, graphics card, hard drive, motherboard, upgradeYorum yokBir bilgisayarı sıfırdan yükseltme
Son zamanlarda masaüstü bilgisayarımın çoğunu yükseltme fırsatım oldu. Çok koşuyordu. Temel Web taraması bile sonsuza dek, oyunlara, grafik uygulamalarına veya hiç bir şeye gerek duymaz.
Mevcut bilgisayarım dört yaşın biraz altındaydı: Radeon HD 4600 ekran kartı bulunan AMD Phenom II X2 550.
Bu yüzden kuruyup yeni bir anakart, CPU , güç kaynağı, grafik kartı ve yeni bellek almayı kararlaştırdım. Ama bütçemin 500 dolar olmasını istemedim.

Neden Yükseltilsin?
Burada ReviverSoft’ta biliyor olabilirsiniz, biz zaten sahip olduğunuz PC’den maksimum kullanım elde etmekle ilgili. Ve 4 yaşındaki makinemle kursu kalmayı düşündüm. Ama nihayetinde parçaların çoğunu değiştirmeyi tercih ettim.
- PC’ye uygun olmayan işler için kullanıyordum
GIMP ve Inkscape gibi yazılımları kullanarak boş zamanlarımda çok fazla grafik düzenleme yapıyorum ve bunlar ciddi grafik yetenekleri ve sahip olduğumdan daha fazla RAM gerektiriyor. Bu nedenle, eğer tamamen çökmeseler, işler bir tarama işlemine yavaşladı.
- Düşündüm ama sonuçta sadece RAM güncellemesi reddedildi
Eski PC’mdeki eski DDR2 bellek yeni bir makinede iki kat daha yeni DDR3 RAM’e mal olacak ve çok daha yavaş olacak. Geri kalanını yükselterek hafızasına çok para biriktiririm.
- Ben zaman zaman oyun oynarım
Birkaç yaşında olan oyunlar bile, grafik ayarları Düşük’ye çevrilmiş olsa bile bilgisayarımda iyi çalışmayacaktı. Ayrıca oyunun nasıl değişeceğini görmek istedim.
- PC’leri bir araya getirmekten zevk alıyorum
Arabalarda çalışmayı seven akrabalarım var. Bilgisayarlarda çalışmayı seviyorum ve bunu yapma fırsatından dolayı heyecan duydum.
Bu siz olmayabilir ve yaptığınız şeyi yapmak yerine PC’nizde tutmak isteyebilirsiniz. Senin durumunda, senin PC Run Like New yapmak için Dokuz Adımlar ile başlamanızı tavsiye ederim. Bir revizyon ile ilgileniyorsanız, ya da sadece ne yaptığımı görmek istiyorsanız, okumaya devam edin.
Her PC bileşeni için seçimlerim ve neden onları seçtim.
İşlemci
Genel olarak, anakartınızı seçmeden önce CPU’nuzu seçersiniz, çünkü bazı anakartlar sadece belirli CPU’ları çalıştırır ve siz de en uygun olanı elde edersiniz. Aslen Phenom II X4 3.6 GHz işlemciye, güzel, hızlı dört çekirdekli bir CPU’ya geçiyordum. Yerel Fry’s Electronics’imde alışverişe gittiğimde, sadece 3,0 GHz’e kadar Phenom II X4s vardı, ki bu da oldukça yavaş.
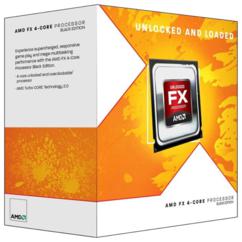
Bu yüzden AMD FX-4100 3,6 GHz CPU ile gittim, ki bu sadece Phenom II 3.0 Ghz’den sadece 10 $ daha fazla oldu. Yeni FX’deki hız yetersizlikleri teknik forumlarında benzer saat hızlarına sahip Phenom II’ye kıyasla şikayetler oldu, ancak bu daha hızlı olduğu için her türlü sorunun üstesinden gelmek gerekiyordu. CPU 110 dolardı.
Neden AMD ve Intel değil? Maliyet. AMD’ler aynı performans için önemli ölçüde daha ucuzdur. Intel CPU’ları hakkında bu kadar çılgın olmadıkça, bu bir beyinsizdir.

Anakart
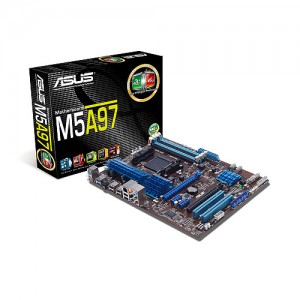
Asus F1A75-V Pro anakartı istediğim gibi, iyi değerlendirmeleri okuyabiliyordum, fakat CPU seçimim yerine bir AM3 + anakartı seçmem için beni zorladı (F1A75-V Pro AM3 + uyumlu değil). Bu teknik gibi görünüyor, ama sadece CPU’m daha yeni olduğu anlamına geliyor, bu yüzden anakartım bunu desteklemeli. Bu yüzden Asus M5A97’yi de seçtim, iyi bir seçim. Eski anakartım bir Gigabyte markasıydı ve Gigabyte’ın web sitesinde herhangi bir şey bulmakta zorlandım. Asus benim düşüncemde daha iyi bir marka. Anakart 95 dolardı.

Grafik kartı
Şimdi, bir çip üzerinde CPU + GPU olan bir APU denen şeyi alabilirsiniz. Bunun anlamı, bir bilgisayar ve grafiklerin hepsini bir arada, çok ucuz bir fiyata almanızdır. Ama bir APU’nun sağlayacağıdan biraz daha fazla grafik gücü istedim, bu yüzden ucuz bir orta sınıf grafik kartı aradım. İş arkadaşım, Nvidia markasını, AMD markası olan, alışkın olduğum şeylerin grafik kartlarını tavsiye etti. Nvidia GTX 550 Ti 1 GB, herkes için çok iyi bir performans sergiliyor, ama kesinlikle en iyisi olmayan oyuncular. Güzel olan şu ki, iki kart almak zorunda değilim ve çok iyi bir şeye ihtiyacım olan her şeyi çalıştırmak için süper pahalı bir şey almak zorunda değilim. Grafik kartı 130 dolardı.

Güç kaynağı
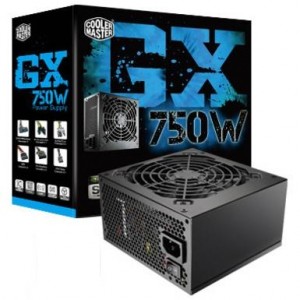
Aldığınız güç kaynağı türü gerçekten grafik kartınıza bağlı. Öneriler için grafik kartı perakende kutusunun arkasına bakın. Bu durumda, Nvidia grafik kartı, bunun anlamı ne olursa olsun, “+12 Volt Akım Değeri 24 Amper” ile en az 400 watt güç kaynağına ihtiyaç duyduğunu söyledi. Bu yüzden güç kaynağı sırasına düştüm ve kutusunun arkasındaki derecenin aslında 750w olduğunu gösteren en iyi güç kaynağı. Aksi halde güç kaynağınızı yakma riskine girdiğinizden, watt üzerinde daha büyük olmak daha iyidir. Ama en önemli şey şu anki dereceye dikkat etmektir. Bu PSU 25 dolarlık indirimden sonra 75 dolardı.

Bellek
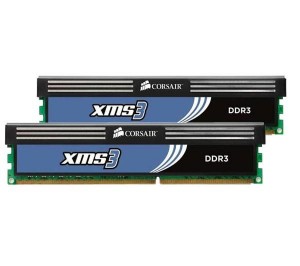
Anakartın destekleyebileceği maksimum bellek hızını ve bellek türünü bulun ve bunun sekiz gigabaytını alın. Benim durumumda 8 GB DDR3 1600Mhz bellek için gittim. Corsair markası da, marka adı da diğer bileşenler kadar bellek için de önemli. Bellek bu günlerde ucuzdur. Bellek 10 dolarlık indirimden sonra 60 dolardı.

Kasa ve Sürücüler
Normalde, tüm bu şeyleri, DVD veya Blu-Ray sürücüsü ve sabit sürücüyü barındırmak için iyi bir duruma ihtiyacınız olacaktır. Bunlar eski bilgisayarımdan taşıdığım şeyler olsa da. Disk sürücüsü hariç. Daha yeni anakartların disk sürücüleri için eski IDE standardına sahip olmadığını, dolayısıyla sürücümün desteklenmediğini ortaya koyuyor. Her şey şu anda Seri ATA’da ya da SATA’da. Bunu yapmak için ihtiyacım olursa, Blu-Ray disklerini yakıp söken bir Blu-Ray sürücüsünü kurtaracağım.
Bir çanta için alışveriş yaparken, tam boyutlu ATX anakartlarını destekleyen bir orta kule olanı arayın. Başın belada olacağından, gerçekten küçük ya da çok büyük ya da tuhaf şekilli vakalara gitme. Onlar üzerinde ekstra kasa hayranları olanlar, kelimenin tam anlamıyla.
Sabit disk için alışveriş yaparken, daha hızlı RPM’ler biraz daha pahalı olsalar da, 1 terabaytlık (TB) ya da daha büyük bir fiyata gitmelerine rağmen. Uzayı beklediğinizden çok daha hızlı kullanacaksınız. Sabit sürücünüz için yaklaşık 100 – 150 dolar harcarsınız.
Son olarak, daha küçük bir düşünün katı hal sürücü sizin büyük bir sabit disk eşlik edecek ve katı hal sürücüye Windows koydu. Geçmişte SSD’leri konuştuk ve onlar da yıldırım hızlı açılış zamanları ve genel erişim zamanları sağlayacaklar, ki bu da giriş maliyetine değer. Radarımda kesinlikle bir SSD var.Toplam tutar
İndirimlerden sonra, yükseltilmiş bir PC satın almak için karşılaştırıldığında çılgın ucuz, benim yükseltme üzerinde 470 $ harcadı. Ne kadar ucuz elektroniğin kazanılmış olduğu inanılmaz. 1995 yılında kendime ait olduğum ilk bilgisayar, 2.000 dolara mal olan bir Pentium-75 idi.
Makalenin 2. bölümünde, bu Frankenstein’ı bir bilgisayardan bir araya getirme görevimden ve kaçırdığım şeylerden geçeceğim, bu yüzden sorunu giderene kadar ilk saat boyunca açılmayacaktı. Yakında bak!
Was this post helpful?YesNoÜcretsiz Sürücü Güncellemeleri
Daha iyi keyif almak için sürücülerinizi 2 dakikadan kısa sürede güncelleyin bilgisayar performansı - Ücretsiz.
Ücretsiz Sürücü Güncellemeleri
Daha iyi keyif almak için sürücülerinizi 2 dakikadan kısa sürede güncelleyin
bilgisayar performansı - Ücretsiz.
Cevap bulamadınız mı?Dünyanın dört bir yanından uzmanların eden bir soru sormak ve hiçbir zaman bir cevap alırsınız.most relevant yeni makaleler Pinterest'te Sabitle