-
-
products
-
resources
-
support
-
company
-
Turn an Old PC into a Home Media Server and Enable File Sharing
By Steve Horton February 28, 2013file and printer sharing, home media server, networkNo CommentsA home media server is a PC, perhaps one you’re not using anymore, dedicated to sharing files on a network with all other PCs. It’s useful to have a computer for this purpose, so that other PCs in the home can find specific files whenever they need to.
The instructions for setting up a PC as a home media server differs depending on your chosen operating system. In this tutorial, I’ll be covering instructions on how to do that for Windows XP, Windows Vista, Windows 7, and Windows 8. I will also tell you how to connect to the resulting Media Server in the different operating systems.
Before we get into setup, we need to discuss what kind of PC you’re going to be using for this. If you don’t have an old computer sitting around that you don’t use, then you’re going to want to get a really cheap machine with a good hard drive to store all your content. Once you’ve done that, you’re going to want to set it up.
Here’s how.
Setting Up a Home Network and File Sharing (With Windows XP)
- Ensure that all computers you want to be on the network are connected to the same router
- If software comes with your router, be sure to install it
- Click Start
- Click Search
- Type Network Setup and run the Network Setup Wizard
- Select This Computer Connects To The Internet Through Another Computer On My Network or Through a Residential Gateway when at the Select a Connection Method Screen
- Name and describe your computer however you please in the next screen
- Name your new home network whatever you want
- Enable file and printer sharing
- Click Next
- Apply these settings to all Windows XP computers on your network, then restart your computer to get it all working
- To tweak sharing options, click the Tools menu, then click Folder Options
- From there, click the View tab and select Simple File Sharing.
- Edit the privileges as you please.
Setting Up a Home Network and File Sharing (With Windows Vista/7/8)
- Ensure that all computers you want to be on the network are connected to the same router
- If software comes with your router, be sure to install it
- Click Start (Windows Key + X in Windows 8)
- Search for Set Up a Network or navigate to it from Control Panel and Network and Sharing Center
- Click Set Up a New Network
- Click Next
- Choose the router or wireless access point you’re using
- Enter the router’s PIN when it asks for it
- Give your computer a name and description, and do the same on all of your other computers in the house
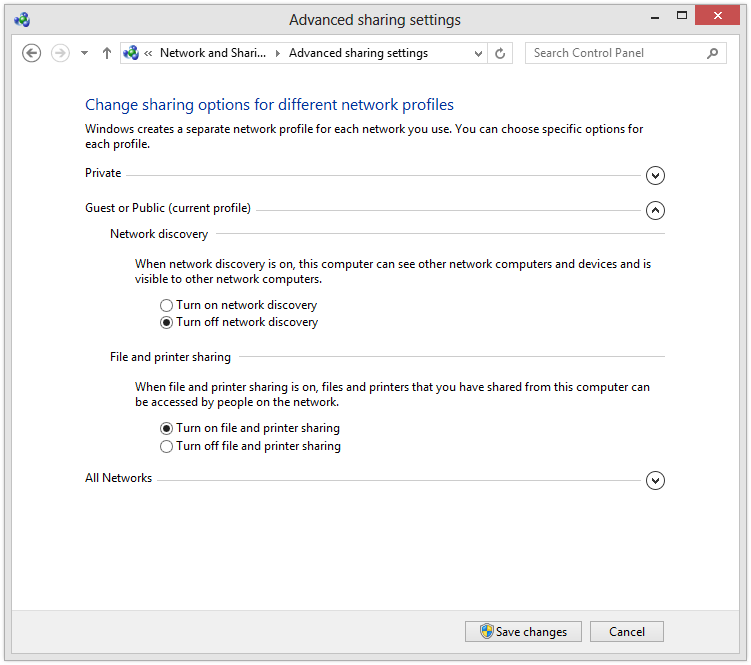
- Go back to Network and Sharing Center and click Change Advanced Sharing Settings
- Select Turn On File and Printer Sharing
- Select what folders you want to be shared with other computers on your network by right clicking on them and clicking Share With…

Turn on File and Printer Sharing from this window.
Accessing Shared Files (On Windows XP)
- Click Start, then click My Network Places
- Select Entire Network in My Network Places
- Choose Microsoft Windows Network
- Open the item named after your workgroup/domain
- Click on the one displaying your computer’s name
- Navigate through the shared folders from there
Accessing Shared Files (On Windows Vista)
- Click Start, then click Control Panel
- Select Network and Internet
- Select Network and Sharing Center
- Enable File Sharing through the Sharing and Discovery interface, then search for the Network Folders through Windows Explorer — if these folders can’t be found, then your network is not configured properly
Accessing Shared Files (On Windows 7)
- Click Start, then click Control Panel
- In Control Panel, double click Network and Sharing Center
- In that, click Show me all shared folders on this computer
- The window that opens afterwards will display the network’s shared folders
Accessing Shared Files (On Windows 8)
- Click Windows Key + X
- Click File Explorer
- Open the Network dropdown on the left side of the screen
- If your computer has already been connected to a network, you should find the shared folders already available
- If you do not see them, your network isn’t properly configured — use this tutorial to review your settings
Note that you can also use an application such as PlayOn on the host computer to automatically stream movies, music and other documents from that computer to any other PC, Xbox, PS3 or mobile phone in the home.
Was this post helpful?YesNoFree Driver Updates
Update your drivers in less than 2 minutes to enjoy better PC performance - Free.
Free Driver Updates
Update your drivers in less than 2 minutes to enjoy better
PC performance - Free.
Didn't find your answer?Ask a question to our community of experts from around the world and receive an answer in no time at all.most relevant recent articles Pin It on Pinterest