-
-
products
-
resources
-
support
-
company
-
About the Dock and Launchpad in OS X Mountain Lion
By Steve Horton May 07, 2013dock, launchpad, mountain lion, os xNo CommentsThe Dock
The dock is the bar of icons that sits at the bottom of the screen on your Mac, separated into two sections by a line. Think of it as a shortcut bar — the left-hand side is a shortcut area for applications (or ‘apps’ for short), while-the right-hand side is for files and folders, along with the trash.
The Launchpad
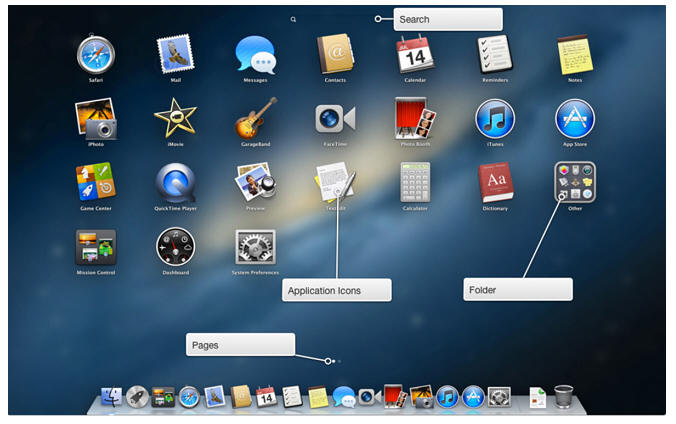
Every application on your Mac can be found in an area called Launchpad — you can get there by clicking the rocket icon in your dock. Here you will see an onscreen grid that contains all the applications installed on your Mac. However, you don’t really want to have to search through all these application icons every time you want to launch your favorite app, and this is where the dock comes in handy. Simply click and drag the icon of each often-used app down to the left side of the dock, and a shortcut to it will stay there for your convenience. You can also move the icons in both the dock and Launchpad into whatever order you like by dragging them around.

The LaunchpadWhen an app icon in the dock is clicked, it will start to bounce, and the app will open. A small light appears under the icon to signify that it is running. If you wish to quit an app, you can do so by clicking and holding (or right-clicking) the icon, and clicking Quit. Occasionally, however, an app may stop responding and not be able to quit. If this is the case, wait a minute or so. More often than not, the app is simply busy doing something, and will soon become responsive again. If the app is still unresponsive after you have waited, however, you can force it to quit by holding Option as you click Quit, changing it to Force Quit. This should close the app immediately.
The right hand side of the dock can hold files and folders. Folders dragged to the right hand side of the dock become ‘stacks’ — simply a useful way to quickly view files and folders in the dock.
Two stacks are in the dock by default: documents and downloads. Simply drag more files and folders to the dock to create more stacks. Right-clicking on a stack gives you options on how to display it, and how to sort it. You may find that the fan view is good for folders with just a few items in them, whereas the grid view is better for folders with many items.

The DockThe right-hand side of the dock has another purpose. If you have a window open, but don’t need it right now and want a place to put it so that it’s out of the way, you can shrink it down to an icon in the dock. You can do this by use of the controls in the top left corner of each window. The red button closes the window, the amber button minimizes it to the dock, and the green button resizes the window to fit the content displayed in it.
Settings for the dock itself can be found in System Preferences, but some are also available by right-clicking the line that separates the left and right hand sides of the dock. You can also adjust the size of the dock by dragging this line up or down to make the dock icons bigger or smaller.
Was this post helpful?YesNoHaving Problems With Your Mac?
Take a FREE scan to find out how you can clean up and revive your Mac.
download now
Didn't find your answer?Ask a question to our community of experts from around the world and receive an answer in no time at all.most relevant recent articles Pin It on Pinterest