-
-
products
-
resources
-
support
-
company
-
Fixing Boot Manager Issues Using Startup Repair
By Steve Horton September 30, 2013bootmgr, startup repair, Windows 7, windows 8, Windows XP3 CommentsTurning on your PC, only to be greeted with the words BOOTMGR is missing, is a panic-inducing experience. The BOOTMGR is a program that runs when you start your PC, and loads your operating system from the hard drive. When it is missing, Windows is unable to boot. Even advanced users have many questions when this error turns up. Is my computer dying? Is my hard drive failing? Is my data safe? There are a number of reasons this error could occur — everything from a loose hard drive cable, to a bad OS upgrade, or even the occasional fluke.
Troubleshooting BOOTMGR
Before you try anything else, restart your computer and let Windows attempt to boot once more. Occasionally this error occurs randomly and there is nothing wrong with your PC. If Windows loads normally, you have nothing to worry about unless the error starts happening frequently. You should also make sure you have no CDs, DVDs, floppy disks, USB drives, or any other external storage media plugged into your PC. Your computer may be trying to boot from one of these, instead of Windows.
Using Startup Repair to fix BOOTMGR
If you’ve ruled out the above causes and Windows still fails to boot, don’t panic: Windows can preform a repair operation to reinstall BOOTMGR. The process is similar on all versions of Windows.
Before you can run any of these options, you must first configure your PC to boot from your Windows disc or USB drive.
To boot from a disc or USB drive:
- When you turn on your PC, text will briefly appear prompting you to press a key for setup. This is commonly a key such as F2 or DEL.
- You will now be in your PC’s BIOS. Locate the boot options.
- On the boot menu select your disc drive or USB (depending on which you need) and place it at the top of the boot order.
- Exit your BIOS and save your changes.
Startup Repair with Windows XP
To perform a Startup Repair with Windows XP:
- Place your Windows XP CD into your computer.
- Restart your computer and press any key when prompted to boot from the CD.
- Press Enter when the setup screen appears.
- Accept the Licensing Agreement and hit F8.
- On the next screen hit R and have Windows run a repair attempt.
- This process can take sometime and your PC might restart during the process.
- Once this repair is finished, Windows will prompt you with several first time installation questions. Answer these and continue to Windows.
Windows XP Startup Repair should keep your files intact. However, you may need to reconfigure some of your settings and reinstall Windows updates.
Startup Repair with Windows 7
Startup Repair with Windows 7 is an even easier process. If Windows 7 fails to boot, Startup Repair will often run automatically and attempt to resolve the issue. If Startup Repair doesn’t run automatically, it can also be run manually.
To perform a manual Startup Repair with Windows 7:
- Place your Windows 7 DVD into your computer.
- Restart your computer and press any key when prompted to boot from the DVD.
- Follow the onscreen instructions and select the preferences which apply to you. (Date/Time, Keyboard Layout, etc.)
- On the next screen, click Repair your computer.
- Select the installation of Windows you wish to repair.
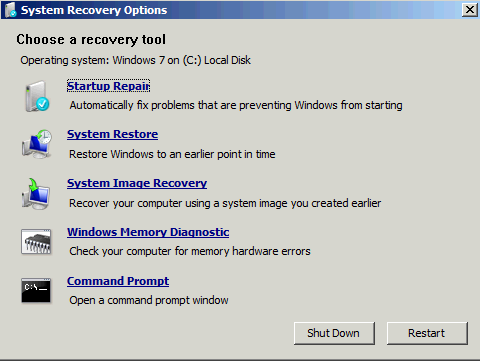
- On the next screen, you are presented with several recovery options. Choose Startup Repair.
- While running Startup Repair, Setup will find and fix any issues it can. You may be prompted on how to continue.
- If prompted, choose the suggested actions.
- Once it is finished, click Finish to restart your PC and complete any repairs.

Windows 7 Recovery OptionsIt is possible that Startup Repair did not repair BOOTMGR the first time around. It may run again automatically or you may have to attempt another manual repair. If so, repeat the above steps to run a second manual Startup Repair.
Windows 8 Startup Repair
Windows 8 comes with some powerful system recovery and repair tools. The process for accessing these tools and running a Startup Repair is similar to XP and Windows 7.
To perform a manual Startup Repair with Windows 8:
- Place your Windows 8 DVD or USB drive into your computer.
- Restart your computer and the Windows 8 Setup screen should appear.
- Click Repair your computer.
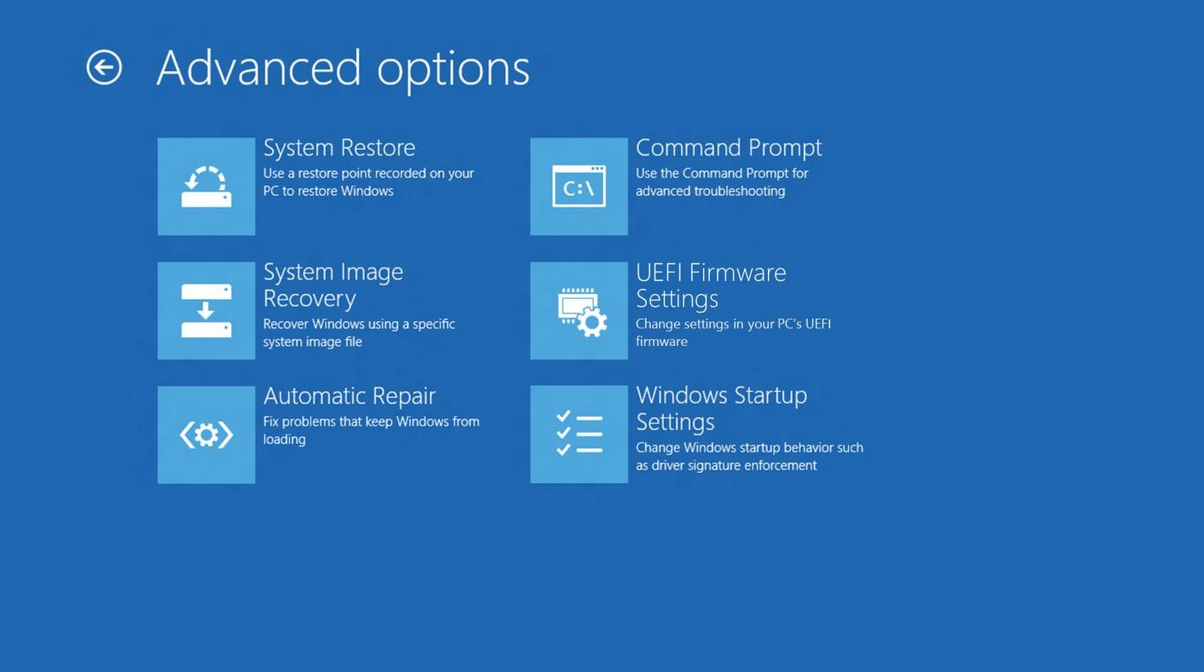
- On the Troubleshoot menu, select Advanced Options.
- Select Automatic Repair from the list of options.
- Your PC will run a diagnostic to determine what issues need repair.
- Once it finds your issue, it will attempt to repair BOOTMGR.
- As with Windows XP and Windows 7, your PC may restart several times during this process. This is normal and nothing to worry about.

Windows 8 Recovery OptionsIf Automatic Repair fails to resolve your issue, you may need to try another option, such as System Restore.
Was this post helpful?YesNoFree Driver Updates
Update your drivers in less than 2 minutes to enjoy better PC performance - Free.
Free Driver Updates
Update your drivers in less than 2 minutes to enjoy better
PC performance - Free.
Didn't find your answer?Ask a question to our community of experts from around the world and receive an answer in no time at all.most relevant recent articles Pin It on Pinterest