| Arra törekszünk, hogy lokalizálni honlapunkon minél több nyelven lehetséges, de ez az oldal jelenleg gépi fordítása a Google Translate. | szorosan |
-
-
termékek
-
erőforrások
-
támogatás
-
cég
-
Hogyan át a meglévő adatokat az új számítógépre? How do I transfer existing data to my new computer?
Által Davide De Vellis December 09, 2013data transfer, windows, Windows 7, windows vista, Windows XP1 CommentAz új PC vásárlása szórakoztató és izgalmas élmény, amíg meg nem jelenik, hogy az új PC általában nem minden kedvenc szoftveres alkalmazásával érkezik, sem az olyan nagy mennyiségű személyes adat, mint a dokumentumok, a zene, a fotók és a filmek. mind tökéletesen szervezett, mint a régi számítógépen.
A Microsoftnak elég hűvös alkalmazása van, amely egy kicsit kevésbé stresszes (és szerencsére nagyon egyszerű) adatátvitelt biztosít a számítógépeken mindenki számára. A hűvös az, hogy az adatokat különböző Windows verziókban is átviheti, például a Windows 8-ról a Windows 7-re, a Windows Vista-ra és még a Windows XP-re is. Az alkalmazás neve Windows Easy Transfer ( Windows Easy Transfer) , amely a Windows Vista összes telepítésének előre telepített programja. Ha Windows XP vagy Windows Vista operációs rendszert használ, letöltheti a Windows Easy Transfer programot a hivatalos Microsoft webhelyekről itt:
A Windows Easy Transfer segítségével minden fájlt és mappát, e-mail üzeneteket és beállításokat, internet beállításokat, programbeállításokat, felhasználói beállításokat és minden médiafájlt át tudsz küldeni. Azonban nem fogja tudni átvinni a kedvenc szoftvereit, például a játékokat, az antivírusokat vagy a webböngészőket. Néhány program, mint például a Spear’s Move Me és a Zinstall XP7 lehetővé teszi, hogy mind az adatokat, mind a programokat áthelyezzük, bár nagy valószínűséggel bizonyos problémák, például kompatibilitási problémák tapasztalhatók. A legtöbb olyan program, amely a licenckulcs (vagy aktiválás) kulcsával, például a víruskeresővel való feloldásához vagy aktiválásához szükséges, valószínűleg nem fog működni. Nagyon ajánlott manuálisan letölteni és telepíteni az összes kedvenc programot a semmiből, így biztos lehet benne, hogy a legfrissebb vagy helyes verziók vannak, és nem jelentkeznek kompatibilitási problémák.
A Windows Easy Transfer lehetővé teszi az adatok háromféle módon történő átvitelét. Van egy részletes bemutató, amely bemutatja az egyes folyamatokat.
- Könnyű átviteli kábel segítségével
- Külső merevlemezen / CD / flash meghajtón keresztül
- Hálózaton keresztül
Az adatok átvitelének módja
Minden módszer első 10 lépése pontosan ugyanaz. Függetlenül attól, hogy melyik módszert választja használni, indítsa el a következő 10 lépést:
- Kapcsolja be a két számítógépet.
- Az új számítógépen kattintson a start gombra.
- Válassza a Minden program lehetőséget.
- Kattintson
Kiegészítők. - Kattintson a Rendszereszközök elemre.
- Kattintson duplán a Windows Easy Transfer ikonra a program elindításához.
- A folyamat elindításához kattintson a Tovább gombra.
- A rendszer megkérdezi, hogy új vagy folyamatos átirányításról van-e szó, válassza a “Új átvitel indítása” opciót.
- Válassza ki a számítógépet.
- A program megkérdezi, hogy van-e kábele, vagy ha más módszereket fog használni. Ha használod a kábelt, akkor folytathatod a bemutatót, de ha más módszereket is használsz, csak gördítsen le arra a helyre, ahol a bemutató folytatódik az előnyben részesített módszerhez.
- Válassza ki az első opciót: “Igen, van egy egyszerű átviteli kábel”.
- Csatlakoztassa az Easy Transfer Cable-t a két PC-port USB portjához. Adjon neki egy kis időt, amíg a meghajtók telepítve vannak. Ha Windows 7 és 8 operációs rendszert használ, az ablakok automatikusan észlelik és telepítik a meghajtókat. Az XP és Vista felhasználóknak azonban manuálisan kell telepíteniük a meghajtókat.
- A régi számítógépen:
- Miután csatlakoztatta a kábelt, megjelenik egy ablak, amely megkérdezi, hogy átmásolja-e a fájlokat, majd válassza a “Nem cselekszi” lehetőséget.
- Indítsa el a Windows Easy Transfer programot.
- Miután a program elindult, válassza a Következő lehetőséget .
- Most meg kell találnod magad ezen a képernyőn.
- Válassza az Easy Transfer Cable használata lehetőséget.
- Ha minden lépést követett, a két számítógépen lévő átviteli program összekapcsolódik egymással, és a következő képernyő jelenik meg az új számítógépen.
- Most térj vissza a régi számítógéphez, és kezdd el kiválasztani, hogy mit szeretne átvinni. Az alábbi első ablakban válassza ki a “Minden felhasználói fiók, fájl és beállítás”
- A megjelenő következő ablakból képesnek kell lennie arra, hogy kiválasszon minden átirányítani kívánt típust és a megfelelő felhasználói fiókokat. Győződjön meg arról, hogy kiválaszthatja a másolni kívánt összes lehetőséget, majd erősítse meg.
- Megjelenik egy új ablak, ahonnan kiválaszthatja az új számítógépen lévő felhasználói fiókot, ahol az összes adatot át kell adni.
- Miután megerősítette a folyamatot a következő gombra kattintva, meg kell kezdenie az átviteli folyamatot. Biztosan várakoznia kell néhány percet, és elkerülheti az átadó kábelt.
- A folyamat néhány perc múlva befejeződik, és új ablak jelenik meg az új számítógépen, megerősítve az átadott adatokat. Úgy néz ki, mint ez:
Ha az eddigi lépéseknek megfelelően követi az összes lépést, megjelenik a képernyő:
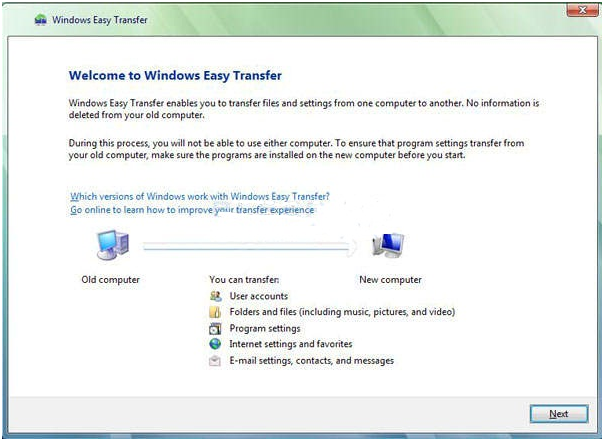
“A Windows Easy Transfer indítása”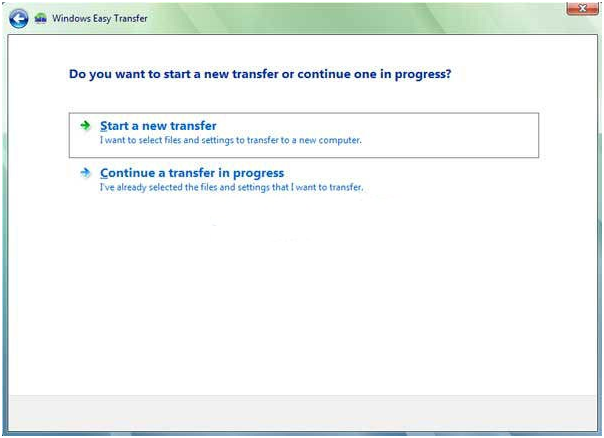
“Windows Easy Transfer”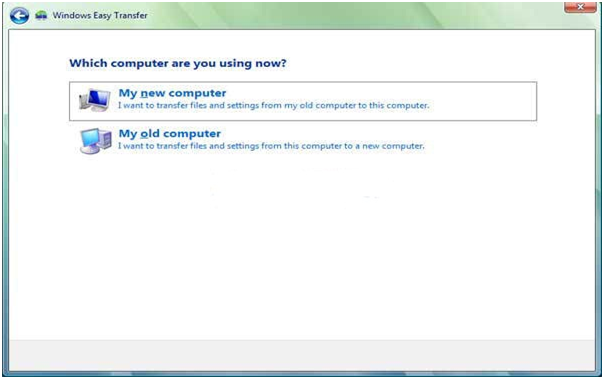
“Válassza ki a számítógépről a”Használjon egy egyszerű átviteli kábelt
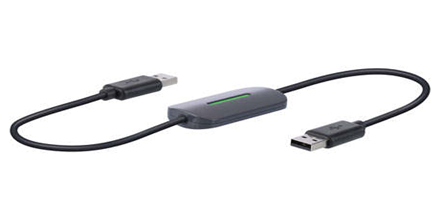
“Egyszerű átviteli kábel”A kábel ugyanúgy néz ki, mint egy USB-kábel két hasonló vége és egy “doboz” a közepén. A kábelek körülbelül US $ 20 körül vannak az Egyesült Államokban (a helyi árak eltérhetnek), és bármely elektronikai áruházban vagy online vásárolható. Megjegyzés: Egy normál USB kábel nem fog működni.
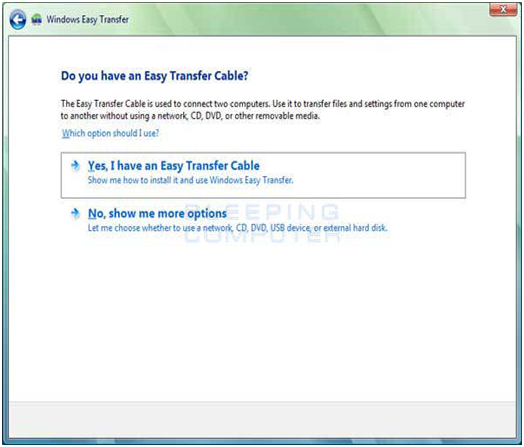
“Beállítások az átvitel befejezéséhez”A következő lépések: 11 – 19 lépés az Easy Transfer Cable használatával az adatok átviteléhez.

“Beállítások az átvitel befejezéséhez”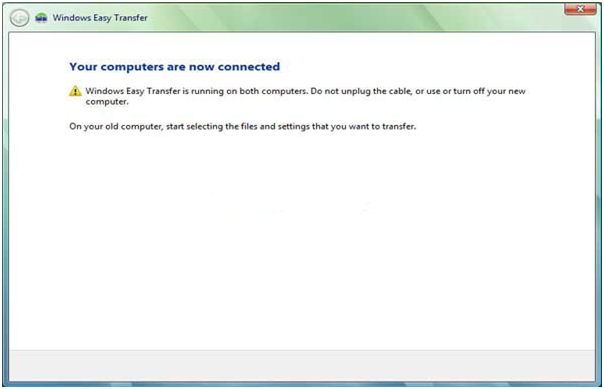
“Amikor a számítógépe csatlakoztatva van, látnia kell ezt a képernyőt”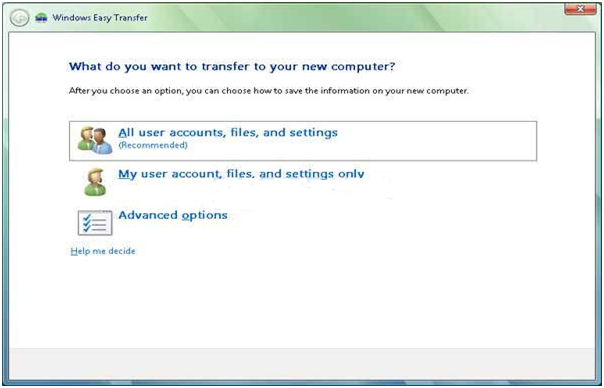
“Válassza ki, amit át szeretne adni”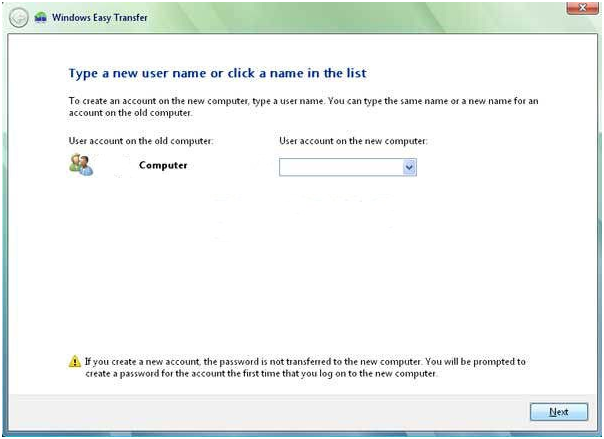
“Válassza ki, hogy melyik felhasználói fiókot szeretne az eltárolt adatok tárolására”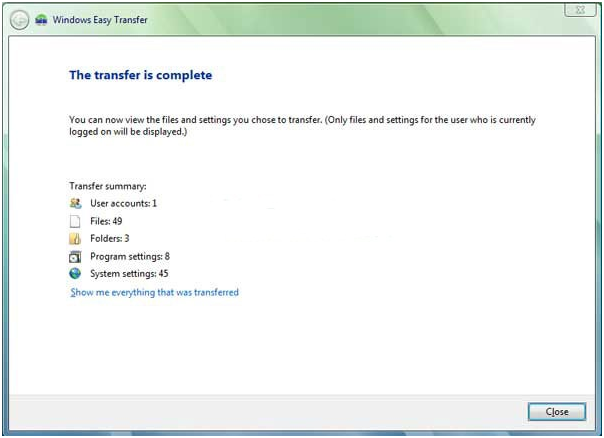
“Ha az átvitel befejeződött, látnod kell ezt a képernyőt”Hogyan továbbítsunk adatokat külső merevlemezen / CD / flash meghajtón keresztül?
Külső meghajtó használata esetén a CD-t vagy a Flash meghajtót a fent leírt lépésekkel követheti. Válassza a “Nem, mutasd meg több lehetőséget”, és a következő képernyőn kell befejeznie:
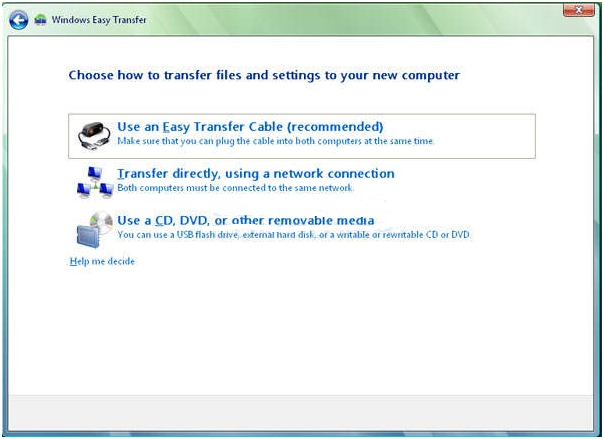
“Válassza ki a CD, DVD vagy egyéb cserélhető adathordozó használatát”Itt olvashat le a külső merevlemez-meghajtó / CD / flash meghajtó adatainak átviteléről szóló lépéseiről.
- Ebben az ablakban jelölje be a CD, DVD vagy más cserélhető adathordozó használatát .
- A következő ablakban ki kell választani az adattovábbításhoz használni kívánt cserélhető adathordozó típusát.
- Válassza ki a meghajtó betűjét, például az “E” vagy “D”, majd kattintson a Tovább gombra.
- A program átmásolja az összes szükséges fájlt a cserélhető adathordozóra. Győződjön meg róla, hogy elegendő hely van a külső merevlemezen / CD-n.
- Miután az összes adatot átmásolta a cserélhető adathordozóra, a következő ablak jelenik meg:
- Távolítsa el a hordozót, és helyezze be az új gépbe.
- Indítsa el a Windows Easy Transfer alkalmazást az új számítógépen, és válassza a Folytatás átvitele folytatás lehetőséget .
- Amikor megkérdezi, hogy milyen típusú átvitelre szeretne folytatni a következő ablakban, válassza a Cserélhető adathordozó lehetőséget, és válassza ki a megfelelő eszközt.
- Végezze el a folyamat többi részét, amíg egy ablak meg nem jelenik, és megerősíti a folyamat befejezését.
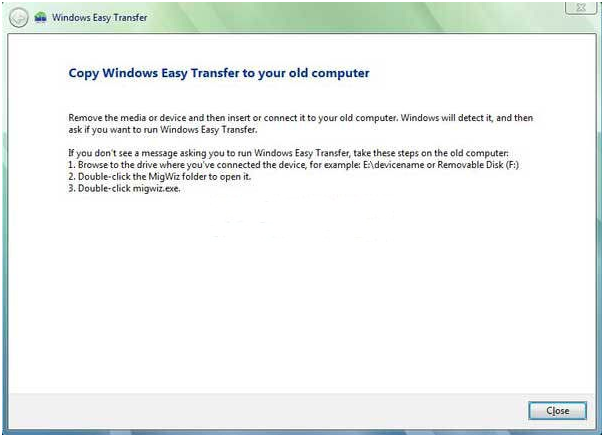
“Készen áll a fájlok külső adathordozón történő átvitelére”Adatok átvitele hálózaton keresztül
Az adatok számítógépek közötti hálózaton keresztüli átviteléhez ismételje meg a fent leírt lépéseket. Válassza a “Nem, mutasd meg több lehetőséget”, és a következő képernyőn kell befejeznie:

“Válassza ki a CD, DVD vagy egyéb cserélhető adathordozó használatát”A következő lépések a 11-es és 19-es lépések a két számítógép közötti adatátvitel módjáról a hálózaton keresztül.
- Ebben az ablakban válassza a Transzfer közvetlenül a hálózaton keresztül .
- A két számítógépen a fájlok biztonságos megosztásához biztonsági kulcsot kell létrehoznia. A kulcsot a Nem opció kiválasztásával generálhatja, kulcsra van szüksége az alábbiak szerint.
- A program kulcsot generál és megjeleníti a képernyőn.
- A régi számítógépen:
- Indítsa el a Windows Easy Transfer programot
- Navigáljon az utasítások között, amíg újra meg nem jelenik a képernyőn
- Ezúttal válassza az Igen, van egy kulcs
- Adja meg a program által az új PC-ben létrehozott kulcsot
- Megjelenik egy új ablak, ahonnan kiválaszthatja az új számítógépen lévő felhasználói fiókot, ahol az összes adatot át kell adni
- A megjelenő következő ablakból képesnek kell lennie arra, hogy kiválasszon minden átirányítani kívánt típust és a megfelelő felhasználói fiókokat. Győződjön meg arról, hogy kiválaszthatja a másolni kívánt összes lehetőséget, majd erősítse meg
- Miután megerősítette a folyamatot a következő gombra kattintva, meg kell kezdenie az átviteli folyamatot. A folyamat néhány perc múlva befejeződik, és új ablak jelenik meg az új számítógépen, megerősítve az átadott adatokat.
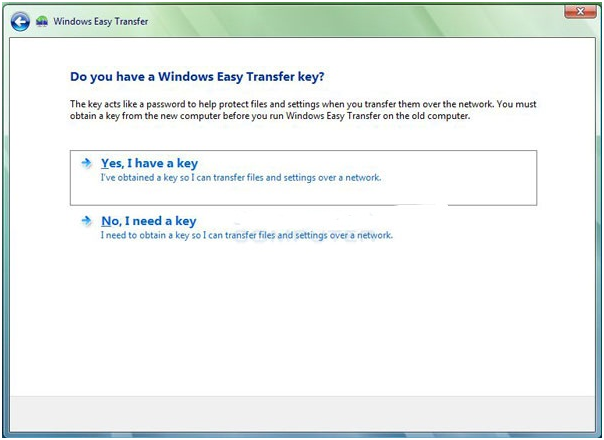
“Győződjön meg róla, hogy kulcsot választ a számítógépek biztonságos átvitelére”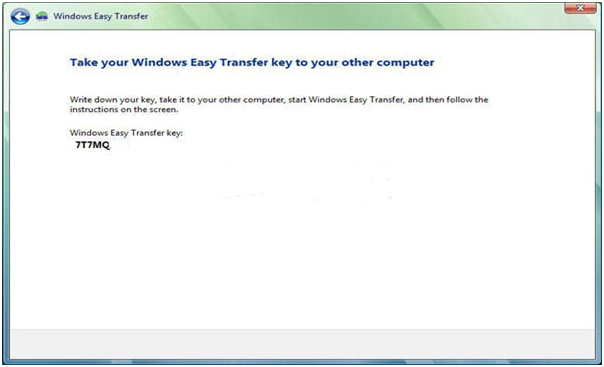
“Egy kulcs generálódik és megjelenik a képernyőn, hogy biztonságos adatátvitelhez használhassa”
“Ezúttal válaszd az” Igen, van kulcsom “elemet, és írd be, hogy elismerd a biztonságos adatátvitelt”És ott van, néhány egyszerű és hatékony módja az adatainak átviteléről a meglévő számítógépről az új számítógépre. Lehet, hogy némi időbe telik, de akkor is megéri, ha megkapja az összes adatát, és máris játszhatsz a vadonatúj, világító, gyors, fényes új berendezéssel!
Was this post helpful?YesNoIngyenes Illesztőprogram frissítések
Frissítse illesztőprogramjait kevesebb mint 2 perc alatt, hogy jobban élvezze PC teljesítmény - Ingyenes.
Ingyenes Illesztőprogram frissítések
Frissítse illesztőprogramjait kevesebb mint 2 perc alatt, hogy jobban élvezze
PC teljesítmény - Ingyenes.
Nem találja a választ?Kérdés, hogy a szakértői közösség a világ minden tájáról, és választ kapni, nincs idő egyáltalán.most relevant Friss cikkek Copyright © 2025 Corel Corporation. Minden jog fenntartva. Használati feltételek | Magánélet | CookiesRögzítse a Pinteresten