-
-
products
-
resources
-
support
-
company
-
How to Defragment your Hard Drive using Disk Defragmenter
By Mark Beare November 30, 2009defrag, defragmnent, hard drive, increase computer performance, slow computer, slow pc11 Comments
How long has it been since you have run a defrag of your hard drive? Typically running a defrag is overlooked or forgotten about by most people but the process is very important and can really help the overall health of your PC.
Defragmentation in essence refers to the process of reducing the amount of fragments in file systems. In other words, it organizes how the files on your hard drive are stored so that they are stored closer together for quicker access. The defragmenter physically organizes the content on your drive by arranging and compacting file pieces to specific locations, so apart from reducing read/write times to/from the disk, you also benefit from the free space it generates.
So how do you defrag your hard drive? We have provided a step by step process below that explains how to defragment your hard drive:
Accessing the Defragmenter: (Administrator privilege required to use the application)
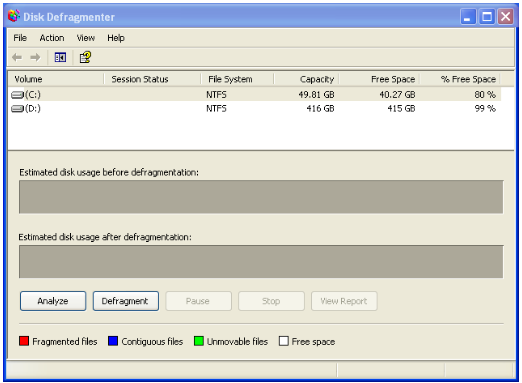
Go to: Start > Programs > Accessories > System Tools > Disk Defragmenter
You should see the window shown below:

From here you have 4 possible actions:
1. Analyzing the disks
2. Saving/Printing the analysis report
3. Defragmenting the disks
4. Disk clean up
Analyzing the drive:
Simply select the drive you want to analyze and click on the Analyze button (or choose Analyze form the Action menu) to start the process.
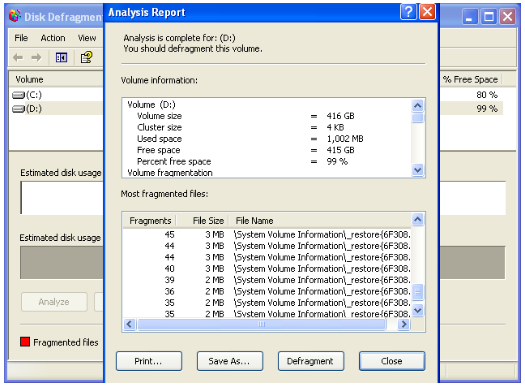
After the analysis is complete you can view the report generated before you proceed with the defragmentation. The report should give you a good idea on the fragments that need attention.

Shown above is the Analysis report that can be saved as a text file or printed for reference.
Please note that if the selected drive has inconsistencies in its file system, the analysis is immediately aborted and you are suggested to run CHKDSK or SCANDISK to repair the same.
You can do this by going to:
Start > Run > CHKDSK
(OR)
My Computer > “select drive” > Right-click > Properties > Tools > Error-Checking
Defragmenting the drive:
Analyzing the drive will give you an indication of the drive’s health. If you find that there are a number of file fragments on your drive then it is recommended to run a defragment. Click on the ‘Defragment’ button on the Defragment utility home screen do begin this after selecting the drive you want to defragment.
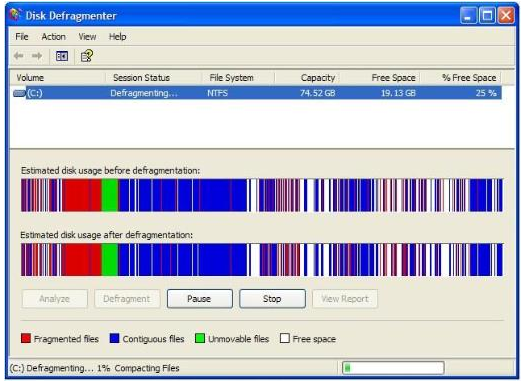
Once the defragmentation starts, you should see a similar window (These windows will vary depending on your version of Windows):

As you can see, a real-time visual statistic on the lower half of the window shows the following:
1. Fragmented Files
2. Contiguous Files
3. Unmovable Files
4. Free
You can clearly see the difference before and after defragmentation. At the end of the defragment you should see more solid blue and very little (ideally none) red color bars.
Key Things To Note:
1. This application physically organizes the content, so the time taken to defragment a volume (drive) directly depends on the amount of space used (files present). Lesser content equals to faster defragmentation.
2. If you do have a lot of content, I suggest you leave the application running when you aren’t using the computer, preferably overnight.
3. It is also advisable to keep all tasks to a minimum, especially on the drive that is being defragmented as it affects the speed of the defragmentation process.
After the defragmentation is complete, you get a report of the changes in the file system and overall statistics of the process. Simply repeat the process for the other volumes (drives) and you’ll have a better experience accessing your files and applications.
Remember, Timely defragmentation of your drives will ensure consistent performance.
The ReviverSoft Team
Was this post helpful?YesNoFree Driver Updates
Update your drivers in less than 2 minutes to enjoy better PC performance - Free.
Free Driver Updates
Update your drivers in less than 2 minutes to enjoy better
PC performance - Free.
Didn't find your answer?Ask a question to our community of experts from around the world and receive an answer in no time at all.most relevant recent articles Pin It on Pinterest