-
-
products
-
resources
-
support
-
company
-
Create and Use System Restore Points in Windows
By Steve Horton March 05, 2012restore point, system restore, Windows 7, windows vista, Windows XP1 Comment
A System Restore Point is a saved state in Windows XP, Windows Vista or Windows 7. Think of it like a “save” in your favorite video game. A Restore Point records the current versions of all your drivers and programs, which programs are installed and not installed, the current update of Windows, the specific Windows settings, and so on.
Major Windows updates will create a Restore Point before updating, but this doesn’t happen often. Therefore, it’s a good idea to know how to make a Restore Point manually, and to create one before making any major system change.
Create a System Restore Point
In Windows XP, click Start, All Programs, Accessories, System Tools, then System Restore. Click Create a Restore Point. Click Next. Enter a description and click Create.
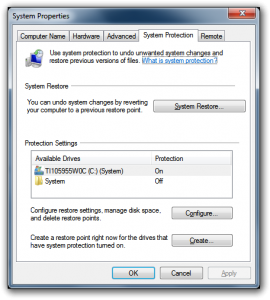
In Windows Vista and 7, click Start, right click on Computer, then click Properties. Click System Protection on the left. Click Create…, then enter a description and click Create.
It will take a few minutes for Windows to create your Restore Point.
Restore to a Restore Point

If your PC is acting up, and you’d like to restore to an earlier Restore Point, you’ll need to reboot in Safe Mode (since your PC is likely not working in Normal Mode). To do this, reset your PC and press F8 before the Windows Logo appears. If you see the logo, you waited too long and you’ll have to restart and try again.
From the list, choose Safe Mode.
Safe Mode looks weird, but it’s a low-resources version of Windows that is not meant to have much installed. After you’re fully online, you’ll need to restore to your Restore Point.
Start the System Restore
In Windows XP, click Start, All Programs, Accessories, System Tools, then System Restore. Click Restore My Computer to an Earlier Time. Click Next. Find the date you created your Restore Point, then click on the name you created earlier. Click Next. The restoration will take place and the system will reboot, and then you’ll see a confirmation on the screen after you log in.
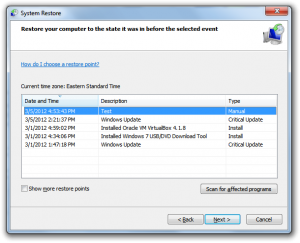
In Windows Vista and Windows 7, click Start, right click on Computer, then click Properties. Click System Protection on the left. Click System Restore… then click Next. Choose the Restore Point you created earlier from the list, sorting by date if necessary. If you don’t see your Restore Point, try selecting the Show More Restore Points check box. Click Next, then click Finish. Your system will reboot, and then you’ll see a confirmation on the screen after you log in.
Was this post helpful?YesNoFree Driver Updates
Update your drivers in less than 2 minutes to enjoy better PC performance - Free.
Free Driver Updates
Update your drivers in less than 2 minutes to enjoy better
PC performance - Free.
Didn't find your answer?Ask a question to our community of experts from around the world and receive an answer in no time at all.most relevant recent articles Pin It on Pinterest